


Price: $9.99 - $8.49
(as of Mar 31, 2025 14:19:20 UTC - Details)
The Best Way to Apply Press-On Nails: A Comprehensive Guide
Introduction
If you're looking for a quick and stylish way to enhance your manicure, press-on nails are the answer. They offer a perfect blend of convenience and creativity, allowing you to switch up your look without the commitment of traditional nail enhancements. In this article, we’re diving deep into the best way to apply press-on nails, ensuring you achieve a salon-quality finish right at home. We’ll explore various techniques, tips, and tricks, while sprinkling in long-tail keywords like “how to make press-on nails last longer” and “easy press-on nail application.” Let’s get started, so you can rock those fabulous nails with confidence!
Understanding Press-On Nails
What Are Press-On Nails?
Press-on nails are artificial nails that come pre-designed and can be easily applied at home. They are available in a variety of shapes, sizes, and designs, making them a versatile option for anyone looking to beautify their fingertips quickly. The appeal of press-on nails lies in their ease of use and the instant transformation they provide.
The Benefits of Using Press-On Nails
Using press-on nails comes with several benefits. They are cost-effective, reusable, and can last for several days if applied correctly. Plus, they come in a wide array of styles, from classic French tips to bold and trendy designs. With press-on nails, you can experiment with different looks without the need for a nail salon appointment.
Choosing the Right Press-On Nails
Factors to Consider When Buying Press-On Nails
When selecting press-on nails, consider the size, shape, and design. Make sure to measure your natural nails to find the perfect fit. Look for materials that are durable yet flexible, allowing for comfortable wear. If you’re unsure, opt for a kit that includes multiple sizes to ensure a perfect match.
Popular Styles of Press-On Nails
Some popular styles include stiletto, coffin, and almond shapes. Additionally, you can choose from matte, glossy, or even glitter finishes. Think about the occasion or mood you’re aiming for. For a casual day out, soft pastel colors might be ideal, while vibrant patterns can elevate a night on the town.
Preparing Your Nails for Application
How to Clean and Prep Your Natural Nails
Before applying press-on nails, it’s crucial to prepare your natural nails properly. Start by removing any old polish and washing your hands. Gently push back your cuticles and buff the surface of your nails to create a smooth base. This preparation helps the adhesive bond better, ensuring a longer-lasting wear.
The Importance of Nail Dehydration
Nail dehydration is often overlooked but is essential for a successful press-on nail application. Use a nail dehydrator or rubbing alcohol to remove any oils from your nails. This step will enhance the adhesion, preventing any lifting or popping off.
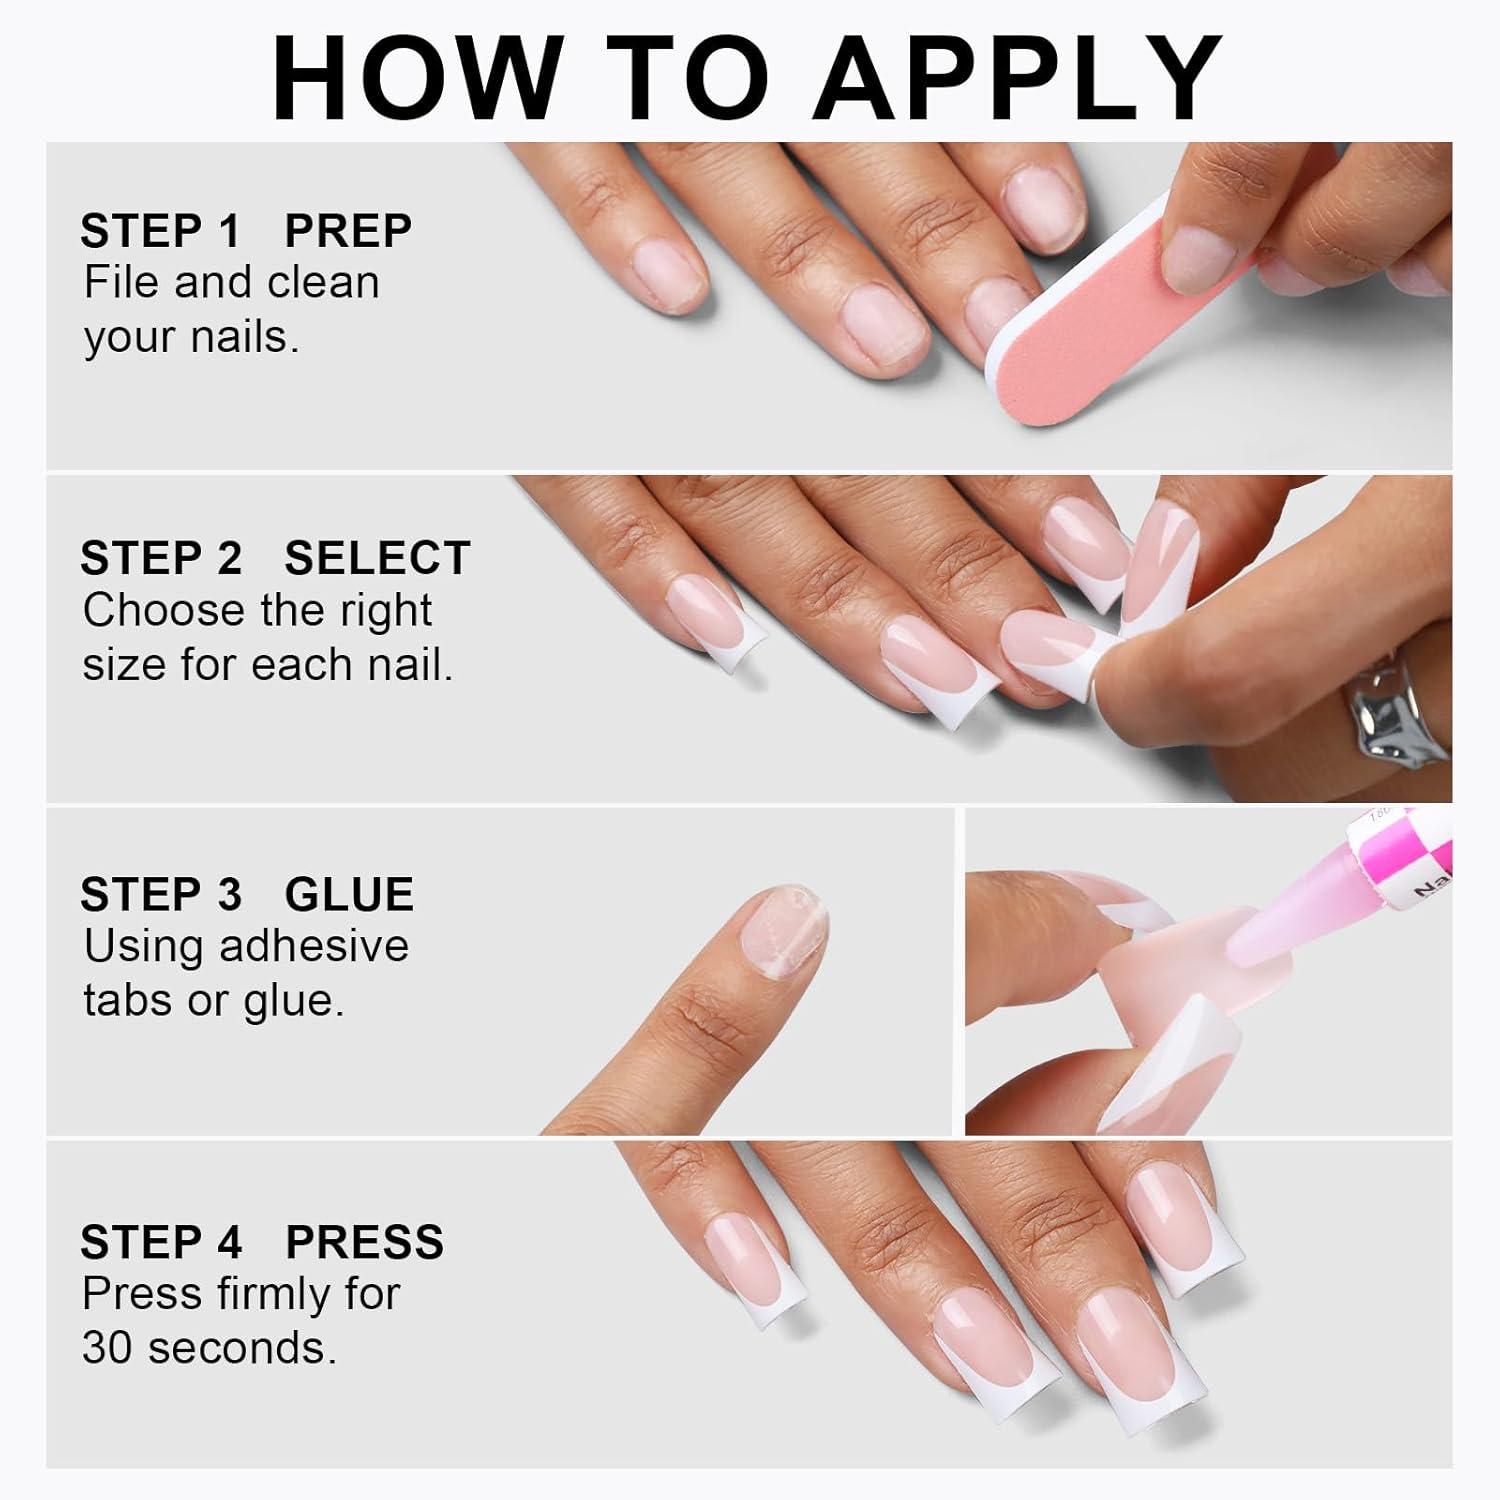
The Best Way to Apply Press-On Nails
Step-by-Step Application Process
- Select the Right Size: Choose the press-on nail that fits each of your natural nails best.
- Apply Adhesive: You can use either nail glue or adhesive tabs. If you want a more temporary solution, adhesive tabs are your best bet. For longer wear, opt for nail glue.
- Press and Hold: Align the press-on nail with your natural nail and press down firmly for about 10-20 seconds. This ensures a strong bond.
- Repeat: Continue this process for all your nails, ensuring even application and a cohesive look.
Tips for a Flawless Finish
To achieve a flawless finish, consider the following tips:
- Use a nail file to shape the edges after application for a more natural look.
- Apply a top coat to seal the press-on nails and add extra shine.
- Avoid soaking your hands in water for the first few hours after application to allow the adhesive to set properly.
Making Your Press-On Nails Last Longer
How to Care for Your Press-On Nails
To extend the life of your press-on nails, avoid exposing them to harsh chemicals or soaking them in water. Wear gloves while doing chores, and be gentle when typing or using your hands. Regularly check the edges for any lifting and reapply adhesive if necessary.
Tips for Removing Press-On Nails Safely
When it’s time to remove your press-on nails, do so carefully to avoid damaging your natural nails. Soak your nails in warm, soapy water for about 10 minutes to help loosen the adhesive. Gently wiggle the press-on nails until they come off. If they resist, do not force them; re-soak and try again.
Exploring Creative Designs
DIY Decorations for Press-On Nails
One of the fun aspects of press-on nails is the ability to personalize them. You can easily add your designs using nail stickers, gems, or even nail polish. Try painting a simple design on a solid color base for a unique touch. The possibilities are endless!
Seasonal and Themed Press-On Nail Ideas
Consider changing your press-on nails according to the season or holiday. For instance, opt for pastel colors in spring, vibrant hues in summer, warm tones in autumn, and festive designs in winter. This keeps your look fresh and exciting!
Conclusion
In conclusion, mastering the best way to apply press-on nails can transform your beauty routine. With the right preparation, application techniques, and care, you can enjoy a fabulous manicure that lasts. So, grab your favorite press-on nails and follow this guide to elevate your nail game. Remember, the key to success lies in choosing the right products and taking the time to prepare your nails properly. Happy manicuring!
【Made by Premium Gel】Our white press on nails are meticulously crafted using a handmade process, including (base coat, color gel, pattern, top coat). The color and patterns are sealed with soft gel rather than printed with ink.
【32 Nails in 16 Sizes】 Customize your manicure with 16 different nail sizes to suit each finger. Each Nail Kit comes with a nail glue,1 sheets jelly adhesive abs,double-sided nail file,cuticle stick,and alcohol pad.
【Perfectly Fitting Press-On Nails】The bottom of Anyos press on nails are flimsy to fit around your nail bed and the top is the sturdiest. They fit perfectly with a seamless cuticle line, making them a great gift choice.
【Choose Your Wear Time】For over 14 days of lasting wear, use both nail glue and adhesive tabs. If you prefer weekly design changes, stick with nail glue. Adhesive tabs are great for short-term events like date nights.
【Time and Cost Savings】Save time and money by skipping the salon! Perfect for those last-minute photo sessions or when you need your nails done and don’t have time to go out.